Now that you’ve read the True Solution to Low Back Pain (Haven’t read it yet? Click here!) you know there can be many different causes of low back pain. Seeing a chiropractor and getting regular adjustments that treat the cause of your pain is the foundation for your recovery and healing process, but you may ask, “what more can I do to speed up the process?” And the answer is there is a lot you can do!
Below are 7 of our favorite exercises to help you lose that low back pain. These exercises not only help stabilize your spine and hold your adjustments longer, but they also strengthen your weak core muscles and get you back to living the life you want to live. Now, remember these exercises are only supplemental to your healing journey and you need to see a chiropractor to treat the cause of your low back pain as well. If you are interested in working with us and would like to join the thousands of other Castle Rock residents that have been helped in our office give us a call at (720) 390-5757.
- Bird Dog
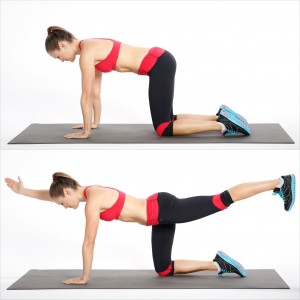
Starting Position: Begin on your hands and knees with your head and back in a straight position. Hands should be under your shoulders, hips directly above knees.
Movement: Activate core muscles. Raise one arm to shoulder level as opposite leg simultaneously lifts off the floor, extending to hip height. Pause momentarily. Return to start position and alternate sides. Maintain a straight spine position, not allowing your hips to twist or rotate. Do not hyper-extend low back when extending the leg. Repeat for 3 sets of 10-15 reps or prescribed repetitions and sets.
- Glute Bridge
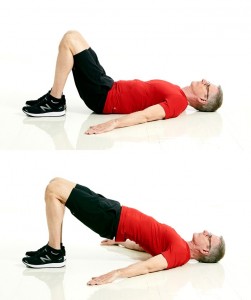
Starting Position: Begin lying on the floor, facing up. Bend knees so feet are firmly on the floor with arms extended to sides.
Movement: Activate core muscles. Lift hips off the floor to attain a bridge position with knees, hips, and shoulders in alignment. Slowly return to start position. Repeat for 3 sets of 10-15 reps or prescribed repetitions and sets.
Initially, you may develop some cramping in the back of your thigh. A simple hamstring stretch, before and after, may prevent this from occurring.
- Pelvic Tilt
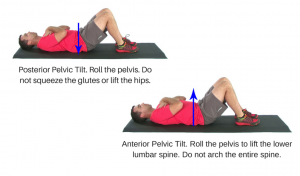
Starting Position: Begin lying on the floor with knees bent, feet flat on the floor. The low back should be relaxed in neutral position.
Movement: Activate core muscles. Flatten low back against the floor as you perform a posterior pelvic tilt contracting lower abdominal muscles and hold for 3-5 seconds. Slowly return to start position and repeat for 8-10 reps, 3x daily or prescribed repetitions, and sets.
- Plank
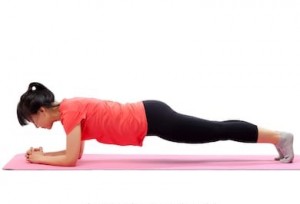
Starting Position: Begin face down with forearms, knees, and feet touching the floor.
Movement: Activate core muscles. Lift knees off the floor so that forearms and toes are supporting body weight. Maintain a straight plank-like position from ankles through shoulders. Maintain core contraction. There should be no movement once this position is attained. Hold for 10-30 seconds or recommended duration. Repeat 2-3 times daily or for prescribed repetitions and sets.
- Dead Bug
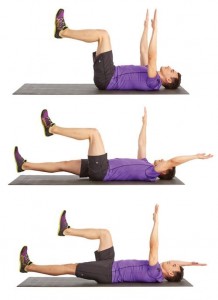
Starting Position: Begin lying on the floor. Lift knees so that a 90º position is attained at hip and knees. Reach arms upward toward the ceiling.
Movement: Activate core muscles. Flatten low back against the floor. Slowly lower one foot towards the floor while opposite arm simultaneously lowers overhead toward the floor. Arm or foot should not contact the floor at any time. Slowly return to the start position and repeat on the opposite side. Continue alternating sides for 3 sets of 8-12 reps, or prescribed repetitions and sets.
- McKenzie Extension

Starting Position: Begin lying face down on the floor or firm surface with elbows bent and hands under shoulders.
Movement: Slowly press body upward arching your back and gently squeezing your lower back muscles. Maintain forearm contact with the surface during the entire movement. Pause momentarily, then slowly lower yourself to the start position. Repeat for 2-3 sets of 5-10 reps or prescribed repetitions and sets.
- 90-90 Pose
For the last exercise here’s a great video of our very own Dr. Joe explaining how to perform it.
https://www.youtube.com/watch?v=bjc-vJY5utE